Nowadays, the majority of businesses and professionals use Office 365. Because Office 365 offers all the business tools at a single subscription. However, users often seek out easy and budget-friendly ways to backup Office 365 mailboxes.
Actually, when you run a business, you may need to send, receive, or manage various emails regularly. That’s why, to keep track of your vital information, you should time-to-time backup your mailboxes.
In this article, I’ll give you a proper guide on how to backup an Office 365 mailbox to PST. Keep reading!
Why should you choose the PST format to backup Office 365 mailboxes?
Actually, you have the option to backup your Office 365 mailboxes into not only PST but also PDF, EML, and some other formats. Compared to the other formats, PST is the best format for preserving your vital data for a long time. Here are some common reasons why you should choose PST:
- As PST files are compatible with Outlook, it’s easy to import and export your mailbox.
- You can save thousands of emails with attachments into a PST file and easily access them using Outlook.
- PST files retain the mailbox data structure, including folders and attachments.
- Instead of having thousands of emails with attachments, PST files are quite light-weight and easy to share.
In fact, compared to any other formats (such as PDF, EML, MBOX, etc.), PST files are more secure. Because you can set a password on your PST files.
Proper guide: How to manually backup Office 365 mailbox to PST?
The manual process isn’t recommended for everyone. If you have experience and enough time, you can go for it. Here I have described the complete process into two steps. Try to follow every step carefully.
Step 1: Connect an Office 365 account to the Outlook app.
Before you start, make sure to install the Classic Outlook app. Because the new version of Outlook doesn’t support import and export folders.
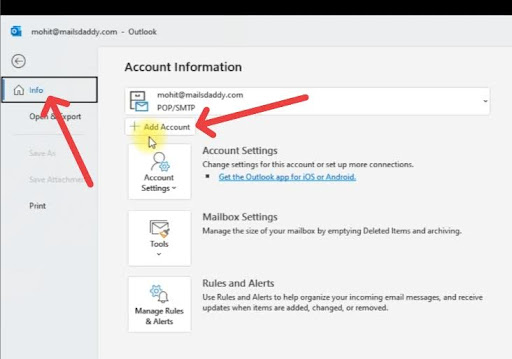
- Open your Classic Outlook app, and at the top-left corner of the dashboard, click on the “File” tab.
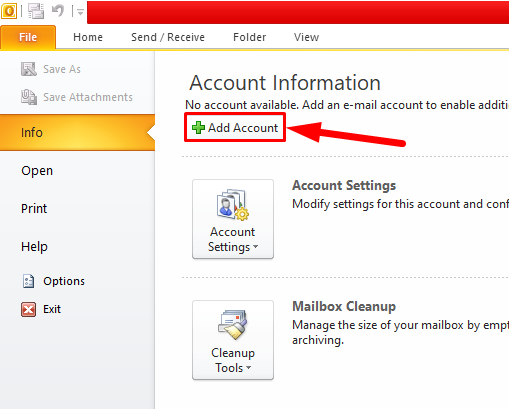
- Now, select the “Info” menu from the left sidebar and click on the “+Add Account” button.
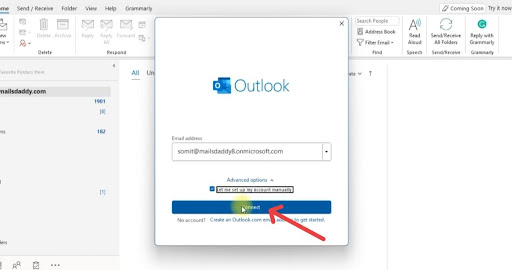
- Type your Office 365 email address, choose the “Advanced option,” and check the “Let me setup my account manually” checkbox. Then click on the “Connect” button.
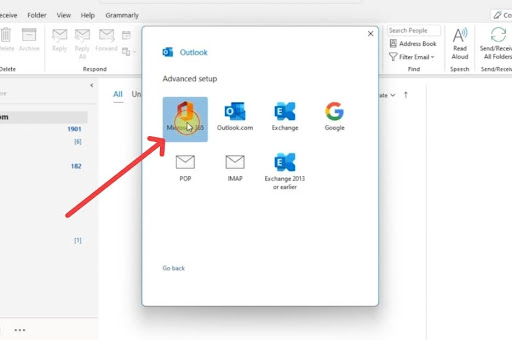
- On the “Advanced setup” wizard, select the “Microsoft 365” app icon.
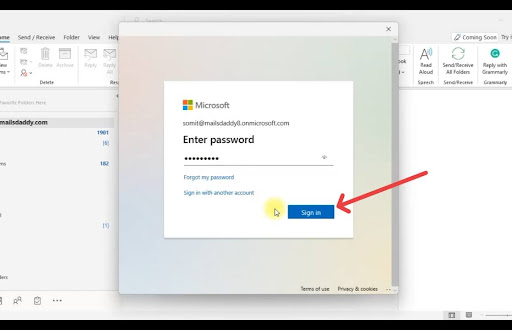
- Enter your Office 365 account password and click on the ”Sign in” button.
- Lastly, allow all the necessary permissions (that it asks to allow) and complete the account setup process.
If you are using Outlook 2016 or 2010 or older versions, you may need to connect your Office 365 account in a different way.
- Go to the “File” tab on your Outlook and click on the “Add Account” button.
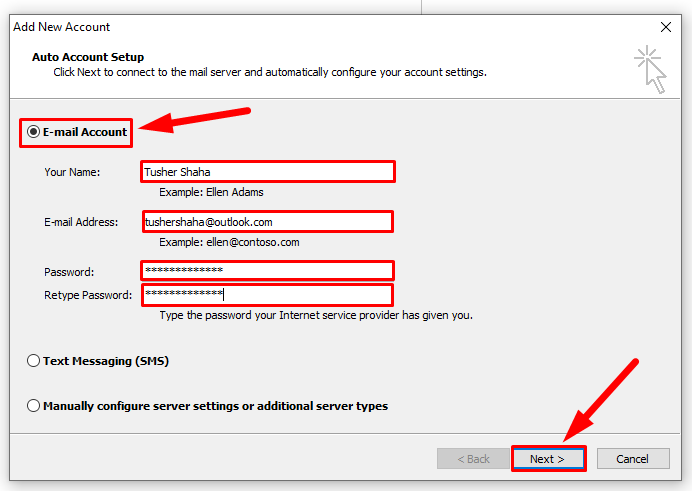
- Now, the “Add New Account” window will appear. Here select the “E-mail Account” option and enter all the necessary credentials (name, email address, and password) of your Office 365 account. Then click on the “Next” button.
Outlook will try to establish the connection, and when it’s done, your Office 365 account will be successfully configured on your Outlook app.
Step 2: Backup Office 365 mailbox as a PST file
Once you successfully performed step 1, it means your Office 365 mailboxes are now available on the Outlook app. So, in this step, you need to export your desired folders as PST format.
- Again, go to the “File” tab. From the left sidebar, select the “Open & Export” menu and click on the “Import/Export” option.
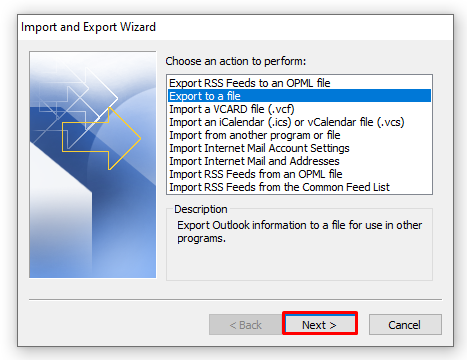
- On the Import and Export Wizard, simply select the “Export to a file” option and click on the “Next” button.
- Then, when the “Export to a file” window appears, select “Outlook data file (.pst)” and click next.
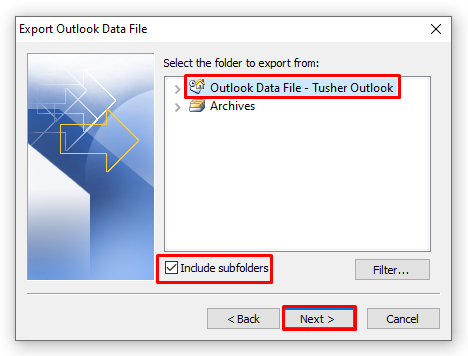
- Now, choose the folder that you want to backup. Ensure to check the “Include subfolders” checkbox. It will export all subfolders under the folder.
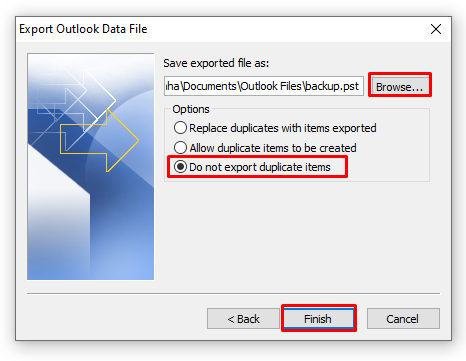
- Afterwards, click on the “Browse” button and specify any location path on your local device where you want to store the backup (PST) file.
- Lastly, set a password for your PST file and click on the “Ok” button. Creating a password for your PST file is totally an optional task for you. You can simply skip it by clicking on the “Ok” button.
By following these two simple steps, you can easily connect your Office 365 account to Outlook and backup or export mailboxes as PST files.
Top-notch solution to backup Office 365 mailbox to PST
With manual methods, you will need to face a lot of difficulties to backup your mailboxes. In addition, it’s time-consuming. So, I recommend using the Regain Office 365 Backup tool. Administrators of several well-known companies are currently using this backup tool, and they have provided five-star ratings on this software. I’ll suggest you try out the trial version to experience all the features and benefits of this software.
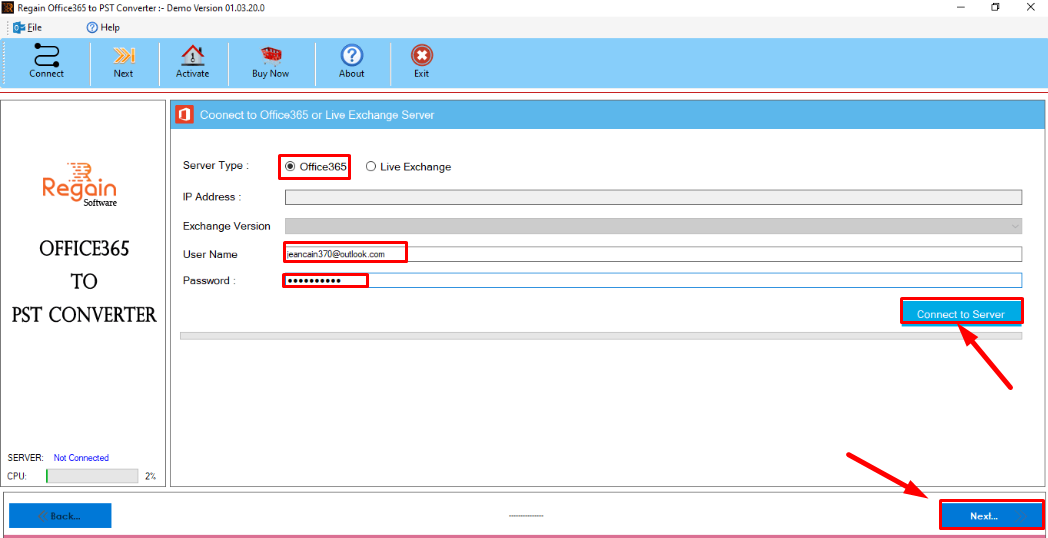
- Firstly, install the Regain Office 365 backup tool on your device and run it as administrator.
- In the “Server Type” field, select the “Office 365” option. Then enter your Office 365 user name, password and click on the “Connect to Server” button.
- Once the Office 365 server is successfully connected, you will get a preview of all your available folders. Select folders which you want to backup and click on “Next.”
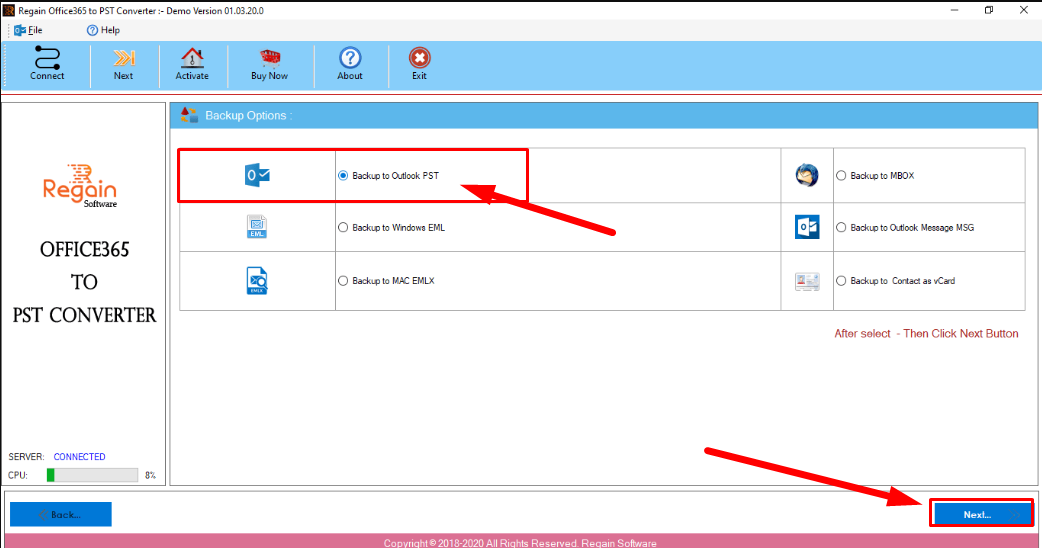
- Choose the “Backup to Outlook PST” option and click on the “Next” button. You can also choose any other formats as per your needs.
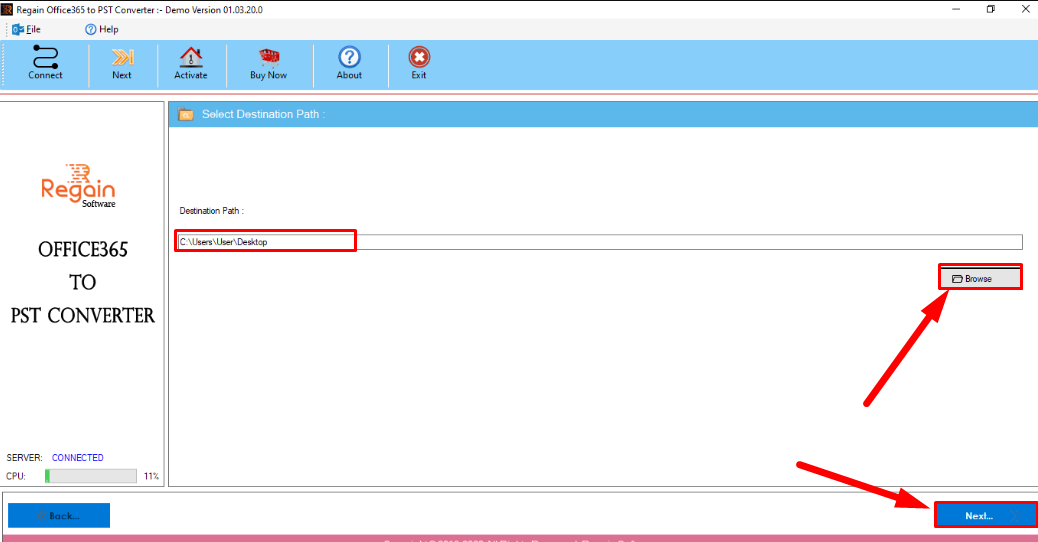
- Now, click on the “Browse” button and specify a location on your device where you want to save the backup file. After you specify the location path, click on the “Next” button.
- Finally, the software will start exporting all your selected folders as PST format.
In this way, the Regain Office 365 backup software helps you to backup your Office 365 mailboxes according to your needs.
Conclusion
Office 365 administrators often seek better solutions to backup Office 365 mailboxes. Actually, taking backups is very important to secure your valuable data. Using the Classic Outlook app, you can manually backup your Office 365 folders to PST format. But it’s quite time-consuming. Instead, you can try out any professional Office 365 backup solutions to automate the backup process.

